Documentation
Quick start guide
Set up audio
While audio is not necessary for all design work, it’s probably a good idea to select your preferred device and settings. If you are starting for the first time, Spektar will default to your system audio which may not be the best option. If there are no default audio devices, you will likely see this:

To start Audio configuration, just click on this area in the toolbar!
Spektar Design Lab supports three kinds of audio systems:
- Default system audio system This will use your default devices on all supported operating systems. While this is great for compatibility, these systems tend to have high latency so may not be ideal for real-time operation.
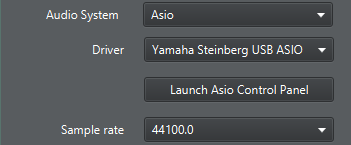
- ASIO audio On Microsoft Windows, you can use an ASIO device. This can enable real-time audio with minimal latency, of course within the capabilities of your computer to render sound at real time. In order to use ASIO you either need a compatible device with latest drivers, or use Asio4All (https://www.asio4all.org/) - a great tool that can emulate ASIO on windows, with virtually any audio device / sound card.
- Jack audio This feature is in beta. On Linux, Mac and Windows, Spektar Design Lab supports Jack audio engine which can produce better latency and performance than the default device, but can be a bit more complex to set up. Please check Jack Audio web site for more information.
To select a device, you can click on the sound toolbar or open settings via Edit -> Preferences menu. The dialog adapts to different audio systems. While we may not be able to control all aspects of each hardware device, we’ve made sure sample rate is always available - this can have impact on the design but also affect real-time performance.
Explore component library
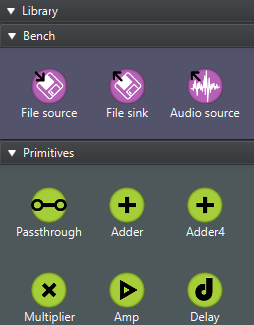
Library is prominent on the left-hand side of the user interface.
Library consists of several categories.
- Primitives which includes basic components / operations such as adder, multiplier etc.
- Generators which includes components that generate signal such as oscillators and LFO.
- Filters which includes built-in filters.
- Bench with components that can support and interface with your design.
- Composite is a section where the graphs you design can be stored as components. See reference topic on Graph export
Since library providers can define their own categories this is a non-exhaustive list.
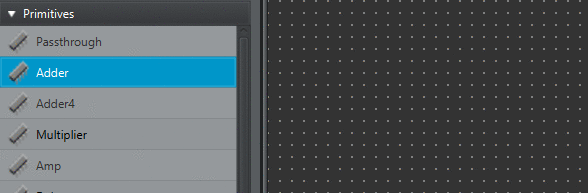
Categories can be opened by clicking on subsection title (e.g. Primitives/Bench). For reference, library is stored in plain xml in the library folder. Library can be maintained by the Library Editor available from the main toolbar or manually by editing XML.
Add a component to the design
Library components can be dragged from library and dropped onto the workspace area. Simply click-and-drag a component and drop into workspace.
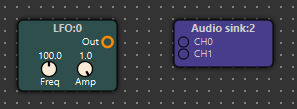
Component has now been added to the design.
Connect components
To connect components:
- Click on a port of the first component (without dragging)
- Move the mouse and point to the target port
- Click the target port to connect.
Connection is now created.
Set up your test bench
Typically you would want an audio or file source and sink for effects, but perhaps just the sink for instruments. Additional components can be added - such as VU meter, Spectrum Analyser etc, but note that these components add to processing load on your CPU.
Run
Before hitting the run button, it is usually a good idea to adjust system volume. Start low, then increase as needed.
Now proceed to review examples.